

These chocolate chip cookie bars are buttery, soft, and loaded with plenty of chocolate chips for an easy dessert that always hits the spot. Made with simple ingredients and baked in one pan, they're perfect when you want all the flavor of classic chocolate chip cookies without the extra work.
Updated March 2026: I've refreshed this post with new tips, expanded FAQs, and helpful make-ahead instructions based on your questions and feedback. Same delicious recipe, even more helpful! Originally posted on February 7, 2014.

There are some recipes that just stick with you. I first made these chocolate chip cookie bars years ago when I was looking for something fast, easy, and guaranteed to disappear at a gathering. And y'all, they have not let me down a single time since. No scooping, no chilling, no fussing. Just press the dough into a pan, bake, and cut into squares. My family was sold from the very first batch.
I've made this recipe so many times that I can tell by sight when the bars are done. Golden at the edges, just set in the center, and still a little soft when they come out of the oven (which is exactly how you want them). These bars have become my go-to whenever I need to feed a crowd or just want something sweet and homemade without spending all afternoon in the kitchen.
If you've been looking for an easy chocolate chip cookie bar recipe that's chewy in the middle and buttery throughout, this is the one. Let's get started!
Jump to:
Why You'll Love This Chocolate Chip Cookie Bar Recipe
- No scooping required - Press the dough directly into the pan and let the oven do the work. No cookie dough balls, no rotating trays, no mess.
- Made with pantry staples - Brown sugar, butter, flour, vanilla, one egg, and chocolate chips. That's it. Chances are you already have everything you need.
- Perfect for a crowd - One batch makes a full pan of bars that you can cut into any size you need. Small squares for a cookie platter, bigger bars for an after-school snack.
- Chewy, rich texture - The brown sugar base keeps these bars soft and fudgy rather than crispy or cakey. They stay chewy for days.
Ingredients You'll Need

- Brown sugar is the star of this dough. It adds deep, caramel-like flavor and is responsible for that chewy, slightly dense texture that makes these bars so irresistible. Don't substitute white sugar, you'll lose the chew.
- Butter gives these bars richness and flavor. Make sure it's softened (not melted), so it creams properly with the sugar. Room temperature butter is key to getting the dough to come together smoothly.
- Egg binds everything together and gives the bars structure. One large egg is all you need for this batch.
- All-purpose flour provides the base. Measure it correctly by spooning it into your measuring cup and leveling off. Too much flour will make the bars dry and crumbly.
- Vanilla extract rounds out the flavor and enhances the sweetness of the chocolate. Pure vanilla gives the best results.
- Kosher salt balances the sweetness. Don't skip it, unsalted bars taste flat.
- Semi-sweet chocolate chips melt beautifully over the top after the bars come out of the oven. You can use 6-8 ounces depending on how chocolatey you want them. I always go closer to 8.
👉🏾 See the recipe card below for exact quantities and full instructions.
How to Make Chocolate Chip Cookie Bars
Here's a quick overview of the process. Full step-by-step instructions are in the recipe card below.
Step 1: Cream the Butter and Sugar
Beat the softened butter and brown sugar together until the mixture is smooth and well combined. This step ensures the sugar is evenly distributed throughout the dough so every bite is consistently sweet. Don't rush it, take about 1-2 minutes to really work them together.
Step 2: Add the Egg and Vanilla
Mix in the egg and vanilla extract until fully incorporated. The dough will look smoother and a bit glossy at this stage, that's what you want. Scrape down the sides of the bowl so nothing gets left behind.
Step 3: Add the Dry Ingredients
Add the flour and salt and mix until just combined. Stop mixing as soon as you don't see any more dry flour streaks. Overmixing develops the gluten and can make the bars tough instead of tender.

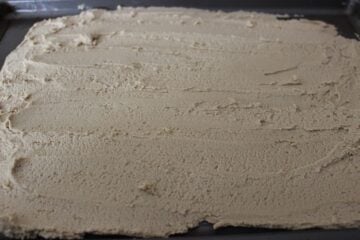
Step 4: Spread the Dough
Press the dough evenly onto your cookie sheet, spreading it to about ¼ to ½-inch thickness. It will be slightly sticky, that's fine. Lightly greased fingers or a spatula sprayed with cooking spray makes this easier.

Step 6: Cool and Cut
Let the bars cool in the pan before cutting. This is the hardest part, but it's important! Cutting too soon will cause the bars to crumble and the chocolate to smear. Give them at least 15-20 minutes.


Expert Tips
- Don't overbake. This is the single most important tip. The bars will continue to cook from the residual heat after you pull them out of the oven. Take them out when the edges are golden but the center still looks slightly underdone, they'll set up perfectly as they cool.
- Use softened, not melted, butter. Melted butter changes the texture of the bars, making them denser and more greasy. Softened butter (slightly cool to the touch but able to hold a thumbprint) creams properly and gives you the best chew.
- Measure your flour correctly. Spoon flour into your measuring cup rather than scooping directly from the bag. Scooping compacts the flour and can add up to 20% more than the recipe calls for, which leads to dry, cakey bars.
- Spread the chocolate quickly. After the chips come out of the oven, work fast to spread them while they're warm and pliable. If they start to firm up before you're done, pop the pan back in the oven for another 30 seconds.
- Use a sheet pan with sides. A flat cookie sheet won't contain the dough properly. Use a rimmed baking sheet or jelly roll pan to keep the dough in place as it spreads and bakes.
- Let the bars cool before cutting. I know it's tempting, but give the chocolate topping at least 15-20 minutes to set before you cut into squares. Clean, even cuts make for a much better presentation.
- Line the pan with parchment. A parchment-lined pan makes cleanup a breeze and ensures the bars lift out cleanly without sticking.
Variations & Substitutions
- M&M version: Swap the chocolate chips for regular or mini M&Ms for a fun, colorful bar that's perfect for parties or holidays. Press a few extra on top before baking.
- Peanut butter chips: Use peanut butter chips instead of (or in addition to) semi-sweet chocolate chips for a sweet-salty twist.
- Add nuts: Stir ½ cup of chopped pecans or walnuts into the dough for extra texture and a slightly nutty flavor.
- White chocolate variation: Use white chocolate chips and a sprinkle of flaky sea salt on top for a more elegant version that's perfect for gift trays.
- Butterscotch bars: Swap the chocolate chips for butterscotch chips for a warm, caramel-flavored bar.
- Dark chocolate: Use dark chocolate chips (60% cacao or higher) instead of semi-sweet for a richer, less sweet bar that pairs beautifully with coffee.
Want To Save This Recipe?
Make-Ahead & Storage
Make-Ahead
The dough can be made up to 24 hours in advance and stored, covered tightly, in the refrigerator. When you're ready to bake, let it sit at room temperature for about 15 minutes to soften slightly before pressing into the pan. You can also bake and cool the bars fully a day ahead. Just store them covered at room temperature overnight and add the chocolate topping right before serving if you prefer a freshly spread look.
Storage & Reheating
Store leftover bars in an airtight container at room temperature for up to 3 days. They also freeze beautifully. Place cut bars in a single layer in a freezer-safe bag or container and freeze for up to 2 months. To thaw, leave at room temperature for 20-30 minutes. No reheating needed, these bars are delicious at room temperature, but if you prefer them warm, pop a bar in the microwave for 10-15 seconds, and it will taste like it just came out of the oven.

What to Serve with Chocolate Chip Cookie Bars
- With a scoop of vanilla ice cream - Turn these bars into a full dessert by serving them warm with a scoop of vanilla ice cream on top. Try pairing with my Mint Chocolate Chip Ice Cream for a fun flavor contrast.
- On a cookie tray - These cut into perfect squares, making them ideal for a dessert platter alongside my Coffee Cookies and Bakery Style Chocolate Chip Cookies.
- With a glass of cold milk - Classic. Never wrong.
- Alongside brownies - Double the chocolate by serving these next to my Fudgy Brownies for a crowd that can't decide between cookies and brownies.
- At a bake sale or potluck - These travel well, cut into clean squares, and appeal to everyone. Pair with Chess Squares for an easy two-bar dessert table.
Frequently Asked Questions
The key to chewy bars is brown sugar (instead of white), not overmixing the dough, and most importantly, not overbaking. Pull the pan from the oven when the center still looks slightly underdone. The bars will continue to set as they cool, and you'll end up with a perfectly chewy texture rather than a dry, crumbly bar.
This recipe works well on a standard rimmed baking sheet or jelly roll pan (approximately 10x15 inches). You can also bake them in a 9x13 pan for thicker bars. Just increase the bake time by 5-8 minutes and check for doneness with a toothpick.
Yes, the original recipe uses shortening, and it works perfectly. Butter will give you a slightly richer flavor, but butter-flavored shortening produces a great result too. Use the same amount either way.
Two common culprits: too much flour (always spoon-measure rather than scoop) or overbaking. If the bars baked up dry, try reducing the bake time by 2-3 minutes next time and make sure you're measuring your flour correctly.
Absolutely! Nuts, M&Ms, butterscotch chips, white chocolate chips, peanut butter chips, or even toffee bits all work beautifully in this dough. Stick to about 6-8 ounces total of mix-ins so the dough isn't overloaded.
Spreading the chips on top right after baking, then returning the pan to the oven for 1 minute, gives you a smooth, glossy chocolate layer across the entire top of the bar, like a built-in frosting. It's a fun technique that makes these bars look and taste extra special.
Yes! These bars actually taste great the day after baking once they've had time to set. Bake them the day before, cool completely, cover the pan tightly, and store at room temperature. Cut and serve the next day.
Look for lightly golden edges and a center that looks just set. It shouldn't jiggle, but it doesn't need to look fully baked. A toothpick inserted 2 inches from the edge should come out clean; one in the very center can still have a few moist crumbs. When in doubt, pull them a minute early.
Yes! Cut them into squares, let cool completely, and freeze in a single layer in a freezer-safe bag for up to 2 months. Thaw at room temperature for 20-30 minutes before serving.
Easily. Double all the ingredients and use a half sheet pan (13x18 inches) for a full batch that feeds a large crowd. The bake time stays about the same, just start checking at 15 minutes.
📖 Recipe

Chocolate Chip Cookie Bars Recipe
Equipment
- 1 sheet pan or baking dish
- 1 stand mixer or hand mixer
Ingredients
- 1 cup brown sugar
- 1 cup butter, softened (shortening works too!)
- 1 large egg
- 2 cups all-purpose flour
- ½ teaspoon kosher salt
- 1 teaspoon vanilla extract
- 6 ounces semi-sweet chocolate chips
Instructions
- Preheat the oven to 350 degrees. Mix together 1 cup brown sugar and 1 cup butter. Add 1 egg and continue mixing until combined. Add 2 cups flour, ½ teaspoon salt, and 1 teaspoon vanilla, and mix together well.

- Spread dough onto a cookie sheet to a thickness of ¼ to ½-inch.
- Bake for 15 to 20 minutes, or until slightly brown. At this point, pull out of the oven and sprinkle 6 ounces chocolate chips evenly over the top.

- Return to oven for 1 minute. Remove and spread melted chips over the top.

- Cut into squares. Enjoy!

Did You Make This Recipe?
If you give these chocolate chip cookie bars a try, I'd love to know what you think! Leave a comment below, share a photo on Instagram and tag @SimplyLaKita, or save it on Pinterest for later. And if you have any questions about the recipe, drop them in the comments. I read every single one!
Wanda Walker says
I just watched this episode and immediately looked for the recipe! Thanks for sharing! I am excited to make these!
LaKita says
You're welcome! Love how easy and delicious this recipe is. Enjoy!
Angela Gilmore says
I love he Pioneer Woman and I saw the episode with these! I'm glad you posted about them though, cause I wasn't sold. Now I'll have to try them!
admin says
They turned out pretty good. I like the idea of spreading the cookie dough instead of making individual cookies.
Leanne says
Yum!! This looks great. I've pinned it to try later. #SITSBlogging
admin says
Great! Thank you...
LeeAnn G Taylor says
Ohhh, these look so yummy. And the spreading idea seems like such a timesaver. I will have to add this to my "recipes to try" list on Plan to Eat (my meal planning software) -- Visiting from #SITSBlogging
admin says
Thank you so much!