

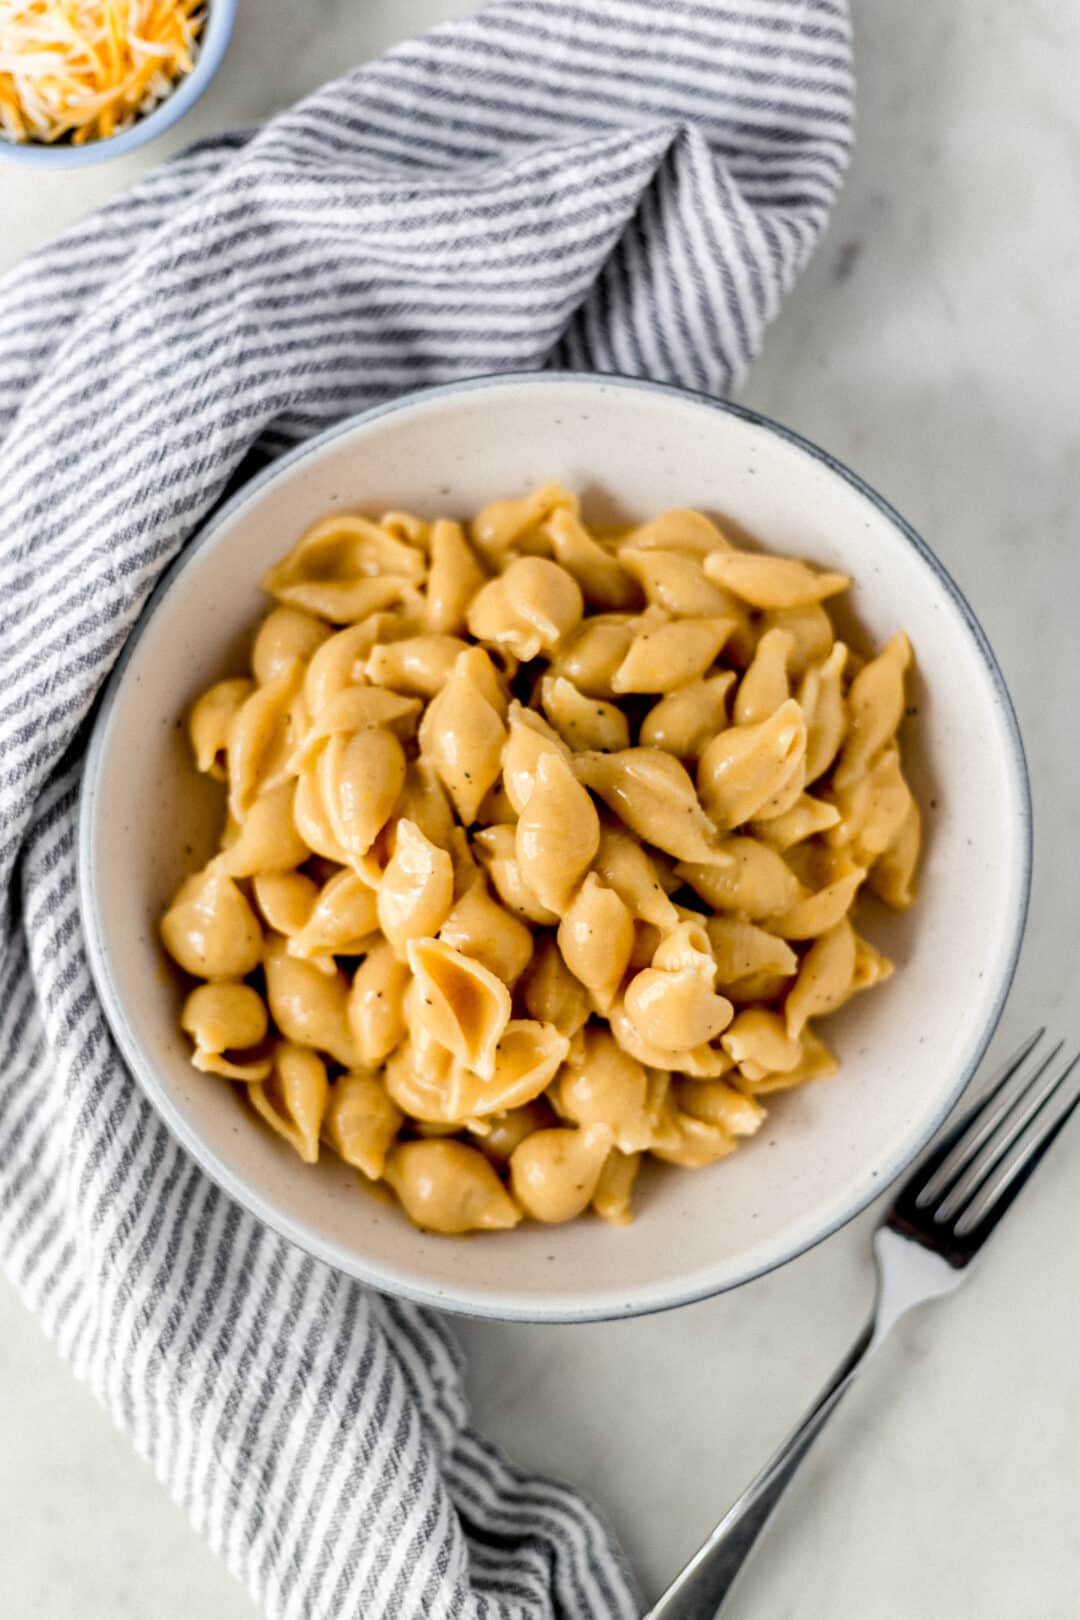
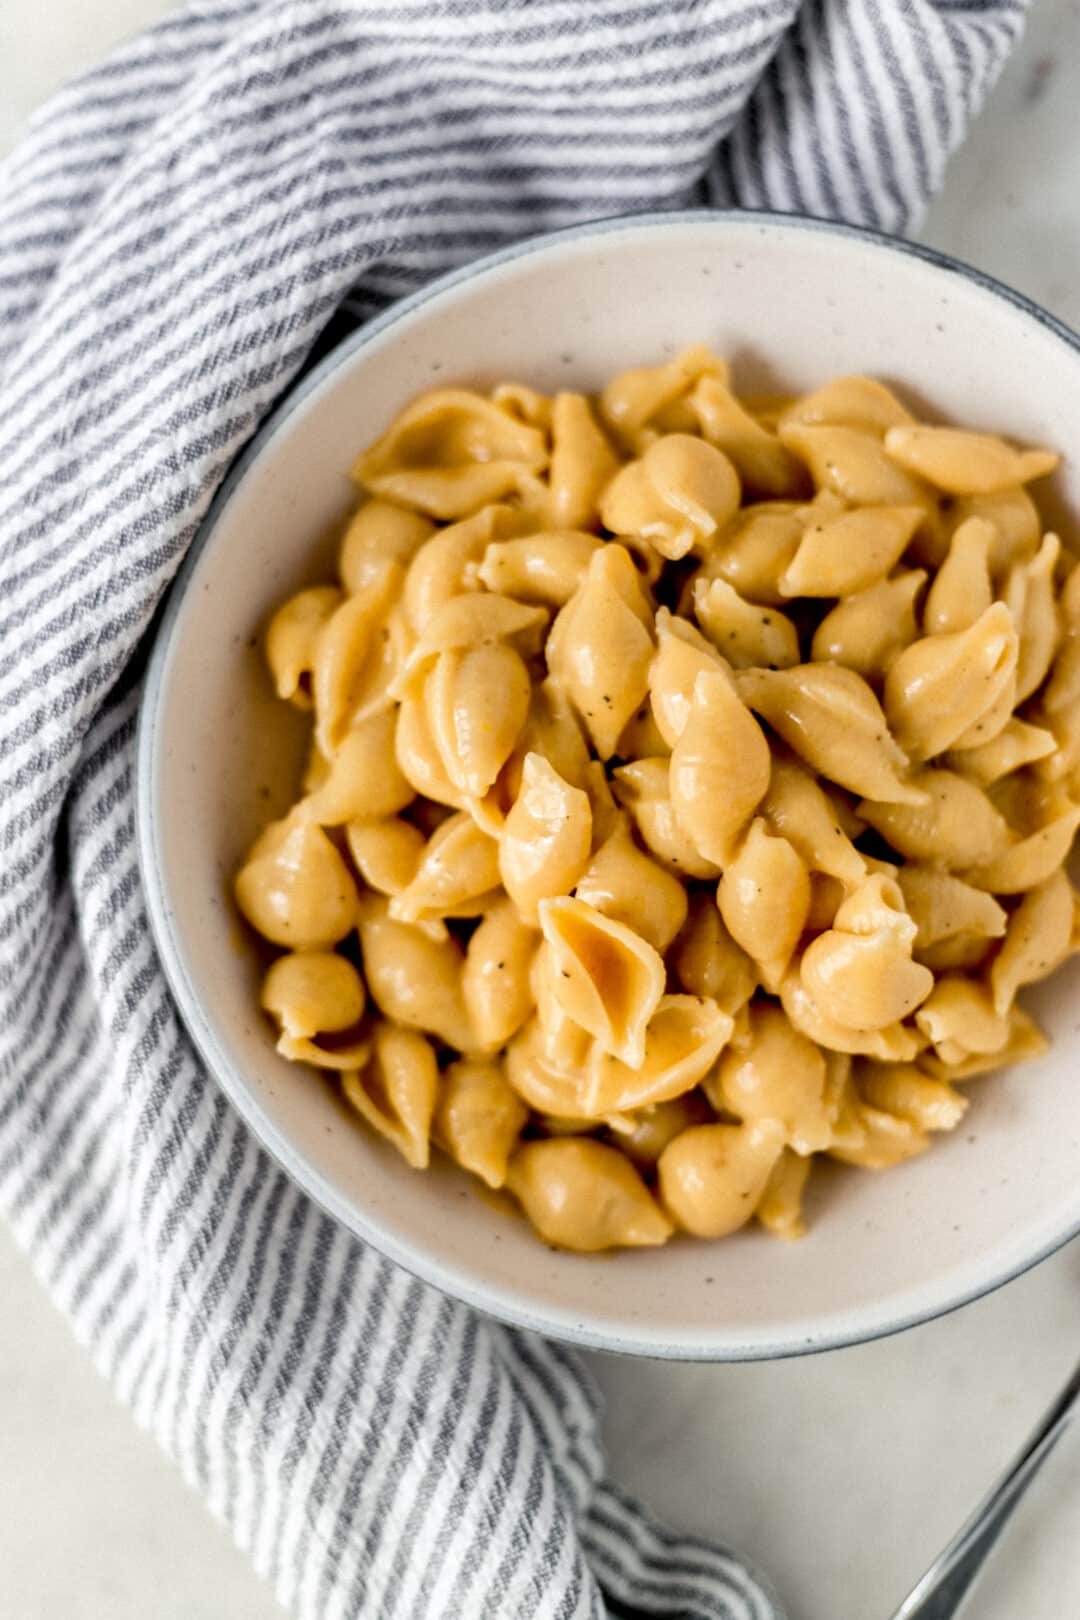
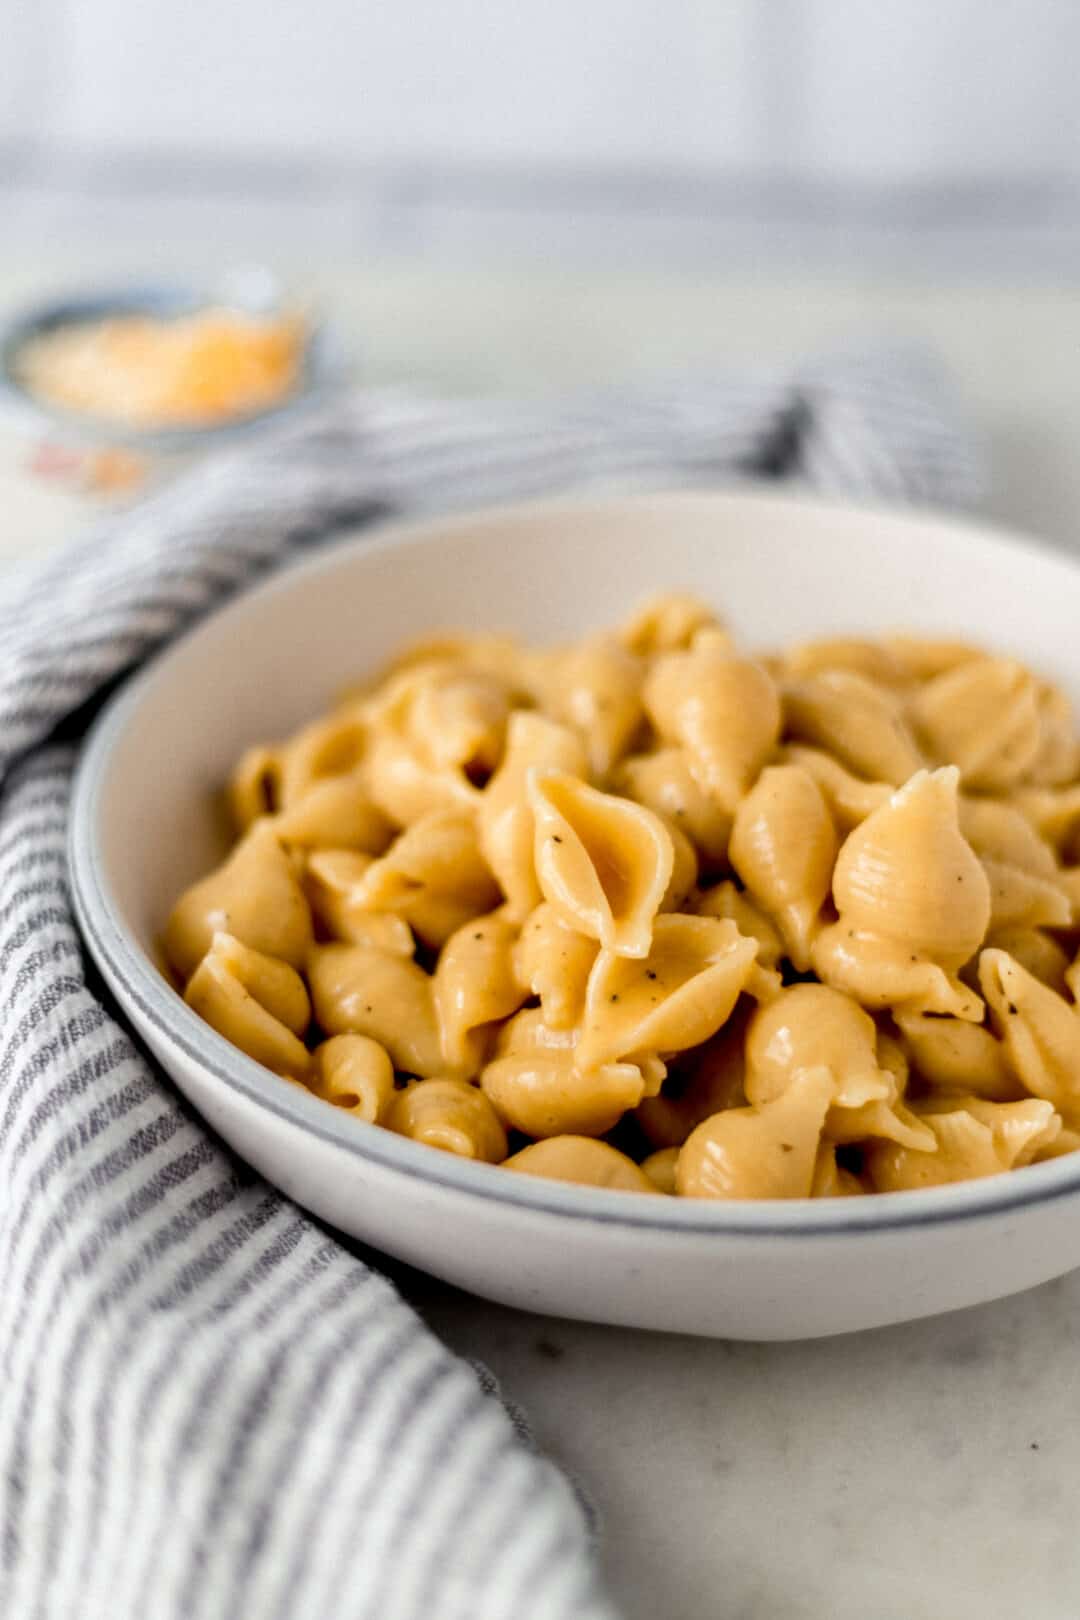
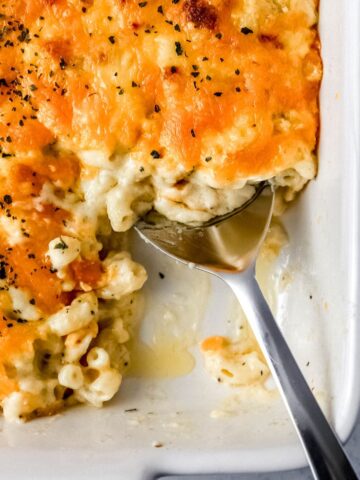
Pressure Cooker Mac and Cheese is an easy comfort food recipe made with tender pasta and a rich, creamy cheese sauce. Ready in minutes, it's the perfect side dish for weeknight dinners, holidays, and family meals.
Updated April 2026: I've refreshed this post with expanded tips, a full FAQ section, storage and reheating guidance, and serving ideas based on your questions and feedback. Originally posted on October 10, 2019.
Mac and cheese holds a very special place in my heart and, honestly, in my kitchen too. Growing up, it was the one dish that could make any hard day feel a little more manageable. Whether it was served alongside fried chicken on a Sunday or spooned up on a Tuesday night when nobody felt like cooking, macaroni and cheese was always the answer. So when I got my first pressure cooker and started experimenting, the very first recipe I knew I had to figure out was this one.
I have been making and testing macaroni and cheese recipes here on Simply LaKita for years. You may already know my Southern Mac and Cheese, that baked, classic version that comes out golden and bubbling and is pure comfort in a dish. But this pressure cooker mac and cheese is something different entirely. It is a true dump-and-go recipe that goes from pantry to table in under 15 minutes, with no boiling water, no draining pasta, and no separate pot for sauce. Every single time I make it, it comes out perfectly thick and creamy.
The secret to this recipe is the combination of evaporated milk and Parmesan cheese, two ingredients that most quick mac and cheese recipes skip. The evaporated milk creates a silkier, richer sauce than regular milk, and the Parmesan thickens everything up beautifully while adding a depth of flavor you just cannot get from cheddar alone. I tested this recipe more times than I can count before landing on this exact formula, and I am genuinely proud of how it turned out. Let's get started!
Why You'll Love This Pressure Cooker Mac and Cheese
- Ready in under 15 minutes - The pressure cooker does all the work, so you can have homemade mac and cheese on the table faster than a drive-through run.
- One pot, no draining - The pasta cooks directly in the chicken stock and absorbs all that flavor, then transforms into the cheese sauce in the same pot. Fewer dishes, more cheese.
- Three-cheese blend for maximum flavor - Sharp cheddar, mild cheddar, and Parmesan work together to create a sauce that is thick, rich, and layered, not flat or one-note.
- Completely customizable - Use shells or elbows, swap the cheese blend, add bacon or jalapeños. This recipe is a flexible base that you can make your own every single time.
Ingredients You'll Need
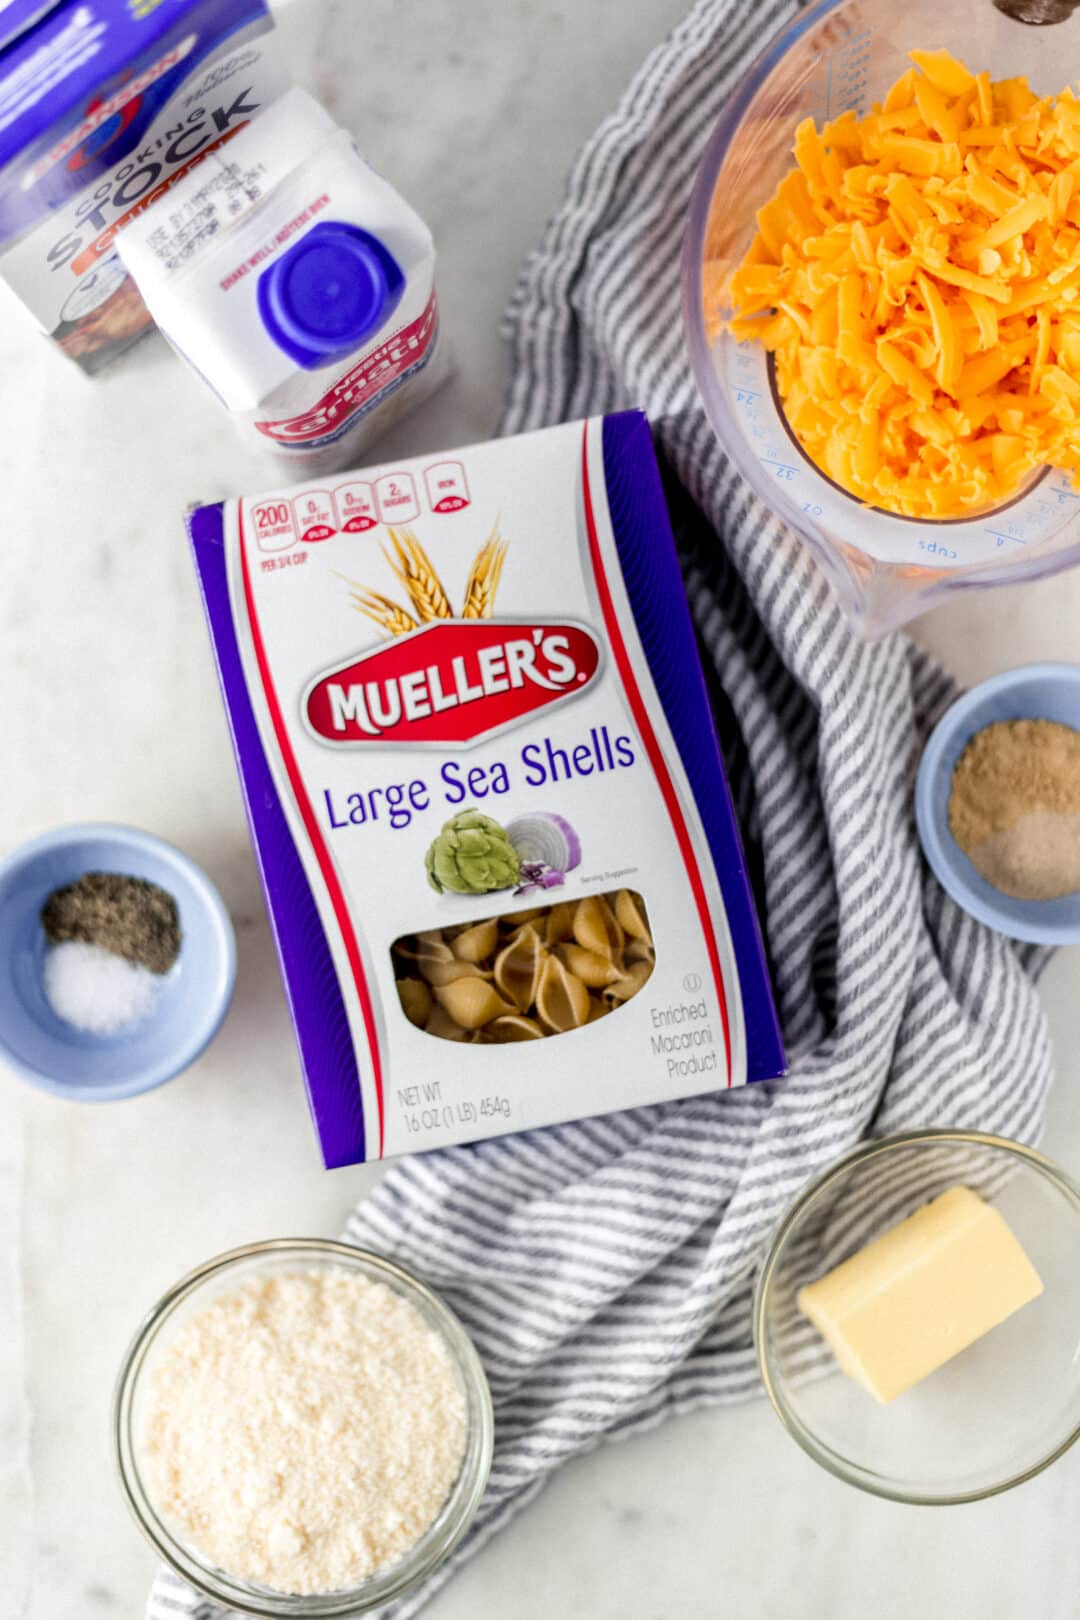
- The pasta: I use either elbow macaroni or medium shells for this recipe. Both work beautifully. Shells hold more sauce in their curves, which gives you an extra cheesy bite. I have tested this with 16 ounces (one full box) and that is the sweet spot for the liquid ratio.
- Chicken stock: This is the cooking liquid for the pasta, and it adds real flavor that plain water simply cannot. You can substitute chicken broth or water. If using water, bump the salt up to 1 teaspoon to compensate.
- Butter: Adds richness to the sauce and helps keep things smooth. You can use salted or unsalted, both work fine.
- Dry mustard powder and garlic powder: These two seasonings are what give this mac and cheese a grown-up, complex flavor. You do not taste them as individual ingredients, but you would notice if they were missing.
- Evaporated milk: This is one of the keys to this recipe. Evaporated milk has had about 60% of its water removed, which means it is richer and thicker than regular milk and stays stable under heat without curdling. It is what gives this sauce its velvety consistency. You can substitute whole milk in a pinch, but the sauce will be slightly thinner.
- Parmesan cheese: The grated Parmesan does double duty, it adds a nutty, savory depth of flavor and also acts as a thickener for the cheese sauce. Do not skip it or substitute it out. Pre-grated or freshly grated both work.
- Sharp cheddar and mild cheddar: The combination of both gives you bold cheddar flavor balanced with a smoother melt. I recommend shredding your own cheese from a block rather than using pre-shredded. The anti-caking agents in bagged shredded cheese can make the sauce slightly grainy. That said, pre-shredded works in a pinch.
👉🏾 See the recipe card below for exact quantities and full instructions.
How to Make Pressure Cooker Mac and Cheese
Step 1: Load the Pressure Cooker
Add the pasta, chicken stock, butter, dry mustard powder, garlic powder, salt, and pepper directly to the pressure cooker or Instant Pot. Give everything a quick stir to distribute the seasonings. Lock the lid and make sure the pressure valve is set to Sealing not Venting. This is the step most beginners miss, so double-check before you walk away.
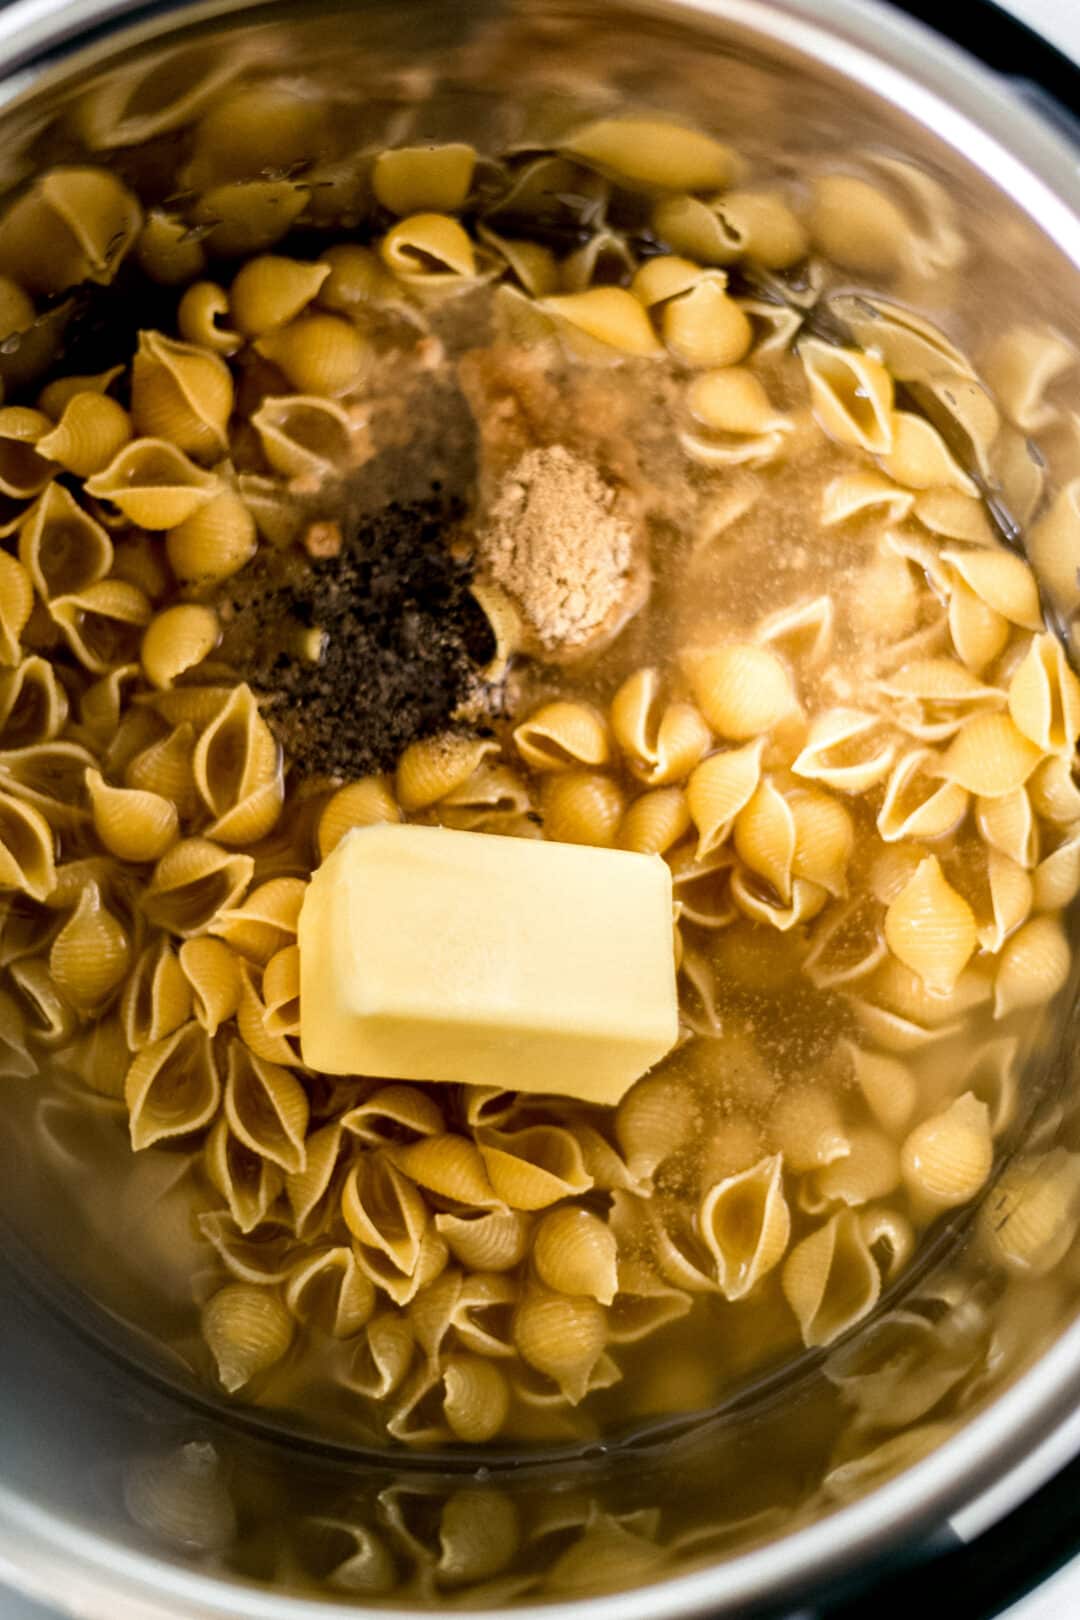
Step 2: Pressure Cook for 4 Minutes
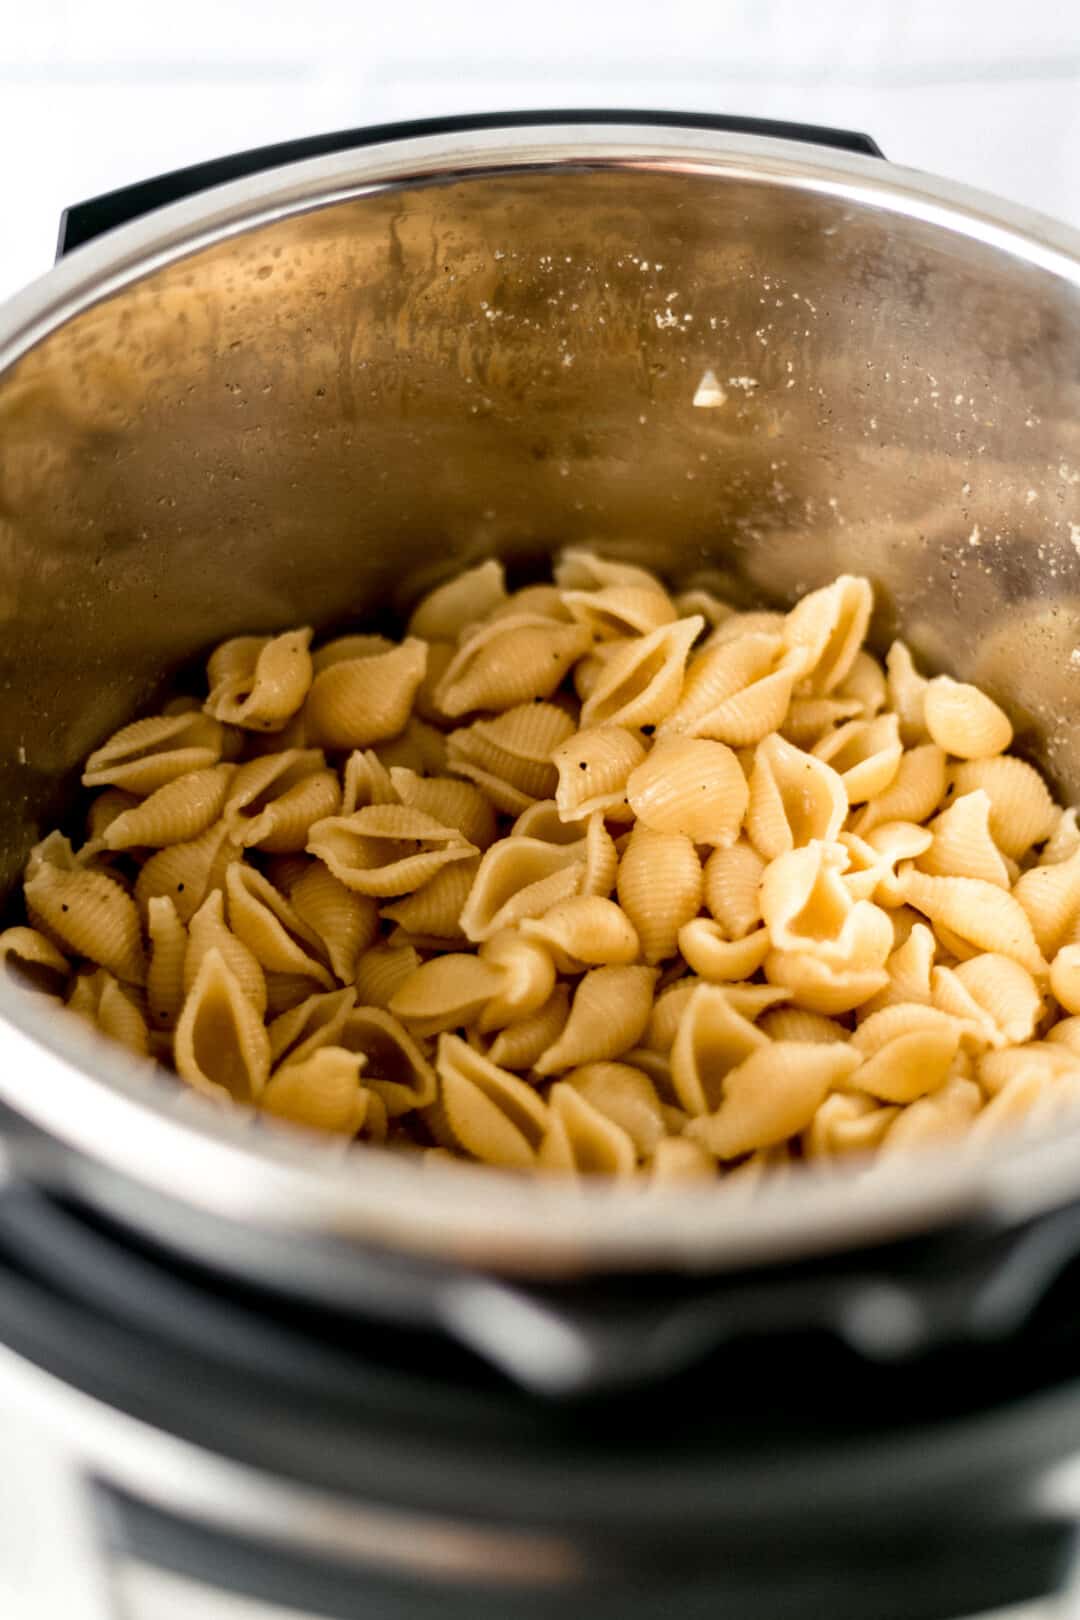
Cook on Manual (or Pressure Cook) on High Pressure for 4 minutes. The pot will take about 8-10 minutes to come to pressure before the countdown begins, that is completely normal. When the 4-minute cook time is done, carefully use the quick release function to release the steam. Use an oven mitt and point the valve away from your face and cabinets, starchy pasta can cause the steam to sputter a little.
Step 3: Stir the Pasta
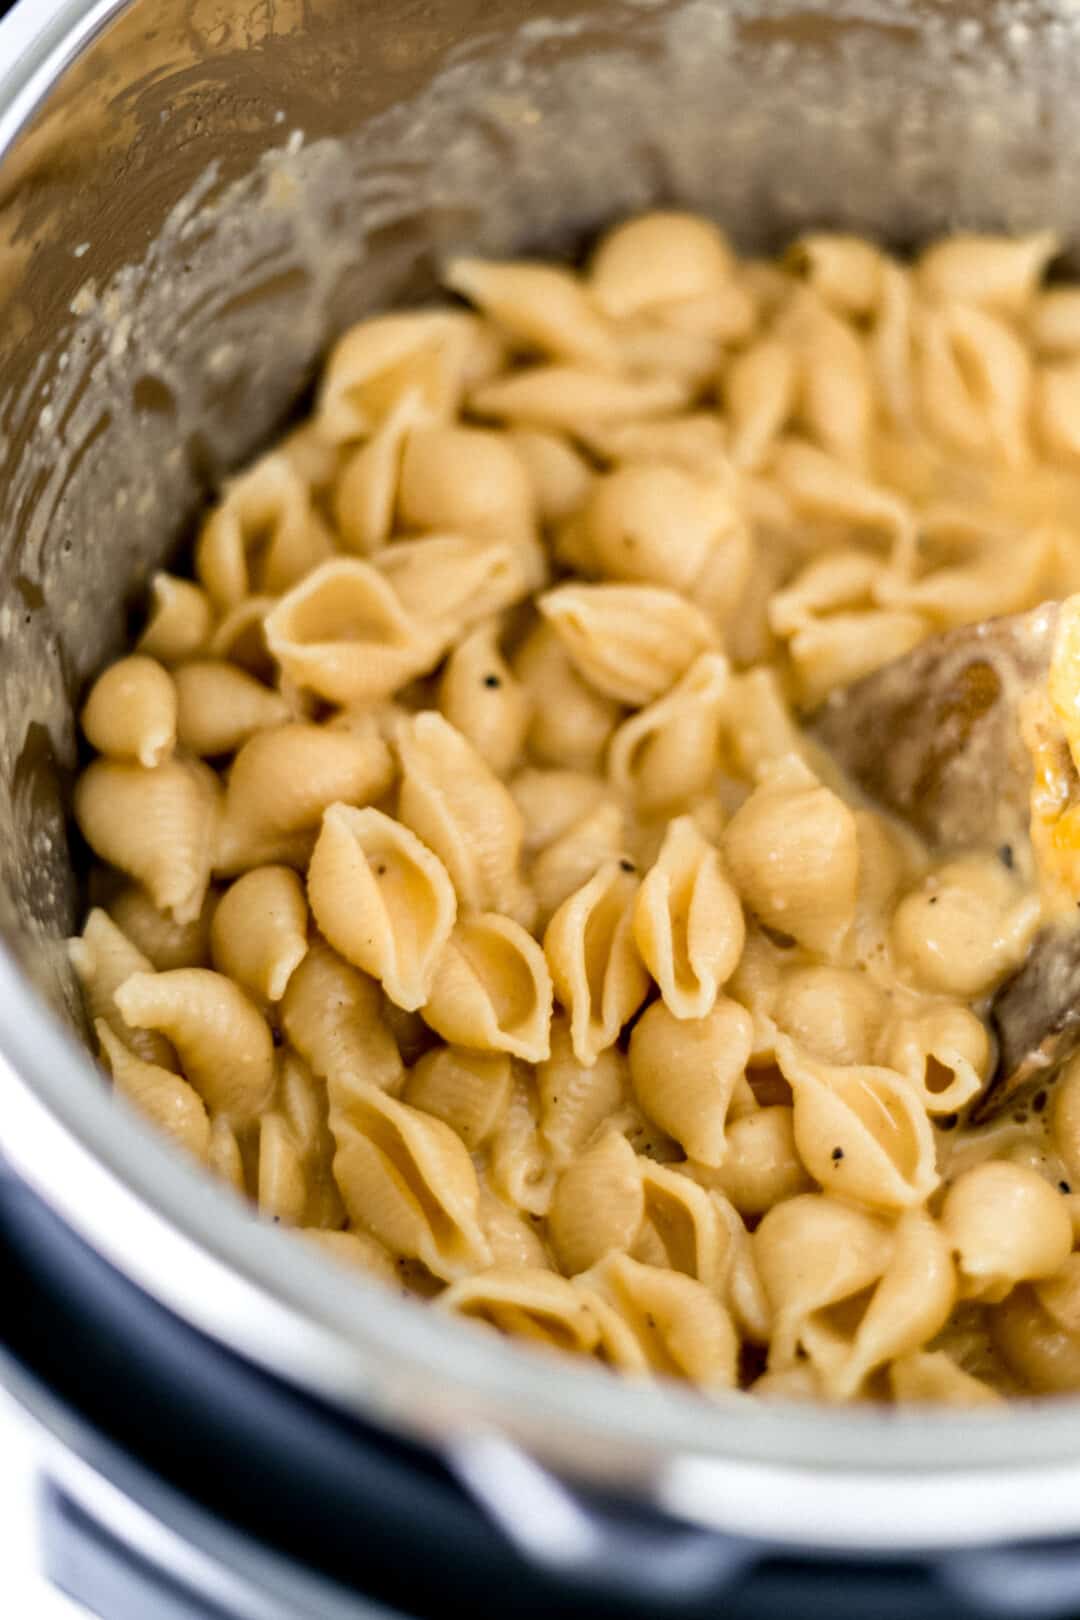
Once the steam has fully released and the lid is safe to open, remove it and stir the pasta and remaining liquid together. The pasta will look like it is sitting in a starchy, buttery broth, that is exactly what you want. That liquid becomes the base of your cheese sauce.
Step 4: Add the Evaporated Milk
Pour in the evaporated milk and stir to distribute it evenly through the pasta. You will see the sauce start to come together immediately. Give it about 30 seconds of stirring before moving to the cheese.
Step 5: Stir in the Cheese
Add all three cheeses. Parmesan first, then the cheddars, and stir continuously until everything has melted and the sauce is smooth and thick. This takes about 2 minutes of active stirring. The sauce will continue to thicken as it sits, so if it looks slightly thin right when you finish, give it 60 seconds and stir again.
LaKita's Expert Tips
- Do not skip the quick release. Natural pressure release adds additional cook time to the pasta and can result in mushy noodles. Always use quick release for pasta dishes in the pressure cooker.
- Shred your own cheese when you can. Pre-shredded cheese contains potato starch or cellulose to prevent clumping, which can make your sauce slightly grainy. A block of sharp cheddar shredded on a box grater makes a noticeably smoother sauce.
- Add the cheese off the heat. After you quick release and stir in the evaporated milk, the pot has cooled down enough that the residual heat melts the cheese perfectly without seizing or breaking. You do not need to turn the pot to Sauté mode.
- The "soupy" stage is normal. Right after you open the lid, the pasta will look like it is sitting in a lot of liquid. Do not panic, stir it, add the milk and cheese, and within 2 minutes it becomes thick and creamy.
- Do not fill the Instant Pot more than halfway for this recipe. Starchy foods create foam under pressure, and overfilling can push that foam into the pressure valve. Stick with one box (16 oz) of pasta.
- Taste before serving and adjust salt. The chicken stock adds saltiness, so taste the finished mac and cheese before adding any extra salt.
- Stir in a tablespoon of cream cheese at the end if you want an extra-silky, ultra-thick sauce, it melts right in and you will not taste it separately.
Want To Save This Recipe?
Variations & Substitutions
- Swap the pasta shape: Elbow macaroni and medium shells both work perfectly at the same cook time. Cavatappi and small penne may need an extra minute. Avoid large shapes that take longer to cook.
- Change up the cheese: The base recipe uses sharp cheddar, mild cheddar, and Parmesan. But you can swap in Gruyère, smoked Gouda, Monterey Jack, or mozzarella for different flavor profiles. Just make sure you keep the Parmesan for thickening.
- Make it spicy: Add a few dashes of hot sauce to the pot before pressure cooking, or stir in a can of diced green chiles with the evaporated milk for a Southwestern twist.
- Add protein: Stir in diced cooked bacon, leftover rotisserie chicken, or smoked sausage after the cheese is melted to turn this into a main dish.
- Make it vegetarian: Substitute vegetable broth for the chicken stock, the flavor holds up well.
- Velveeta version: Substitute 8 ounces of cubed Velveeta for the cheddar cheeses for an ultra-smooth, extra creamy sauce that kids absolutely love.
Make-Ahead & Storage
Make-Ahead
This mac and cheese is best made fresh, the sauce is at peak creaminess right out of the pot. However, you can prep your cheese by shredding it up to 2 days ahead and storing it in a zip-top bag in the refrigerator. All the dry ingredients (mustard powder, garlic powder, salt, and pepper) can be pre-measured and combined in a small bowl so the recipe is even faster to assemble on a busy weeknight.
Storage & Reheating
Storage: Let the mac and cheese cool completely before transferring to an airtight container. It will keep in the refrigerator for up to 4 days. I do not recommend freezing, the sauce tends to separate and become grainy once thawed.
Reheating: Add the leftover mac and cheese to a saucepan over low heat and splash in 2-3 tablespoons of milk. Stir gently and heat until warmed through, adding more milk as needed to loosen the sauce back to a creamy consistency. You can also reheat in the microwave. Transfer to a microwave-safe bowl, add a splash of milk, and heat in 45-second intervals, stirring between each, until hot.
What to Serve with Pressure Cooker Mac and Cheese
- As a classic Southern side dish - Pair it with Southern Fried Chicken or a slow-cooked pot roast for a full comfort food spread that your whole family will love.
- With garlic green beans - Try it alongside Garlic Green Beans for a simple, satisfying weeknight plate that comes together fast.
- Next to a great steak - Serve this as the side for a perfectly cooked Ribeye Steak for a steakhouse-quality dinner at home.
- With Southern cornbread - A slice of Honey Butter Cornbread alongside a big bowl of this mac and cheese is about as comforting as dinner gets.
- Topped with broccoli - Stir in a cup of steamed broccoli florets right before serving, or check out One Pot Broccoli Mac and Cheese for a built-in veggie version.
Frequently Asked Questions
Yes, this recipe works in both. The 6-quart is the standard size and works perfectly. If you have an 8-quart, the pasta cooks the same way, but the pot is larger so it may take a minute or two longer to come to pressure. Do not fill the pot more than halfway to avoid foam getting into the pressure valve.
No, and this is one of the best things about this recipe. The pasta is cooked in just enough liquid that it absorbs almost all of it by the time the cooking is done. The small amount of starchy liquid that remains is stirred right into the cheese sauce, it actually helps thicken it.
I do not recommend doubling it in the same pot because starchy foods create foam under pressure, and overfilling can cause issues with the pressure valve. If you need a larger batch, make two rounds back-to-back. The second batch comes together just as fast.
That is completely normal! The pasta will look like it is sitting in a brothy liquid when you first open the pot. Once you stir in the evaporated milk and the cheese, that liquid emulsifies into the sauce and thickens up beautifully. Give it a couple of minutes of stirring and it will come together.
You can, but evaporated milk is strongly recommended for the best results. Because evaporated milk has had most of its water removed, it is richer and creates a thicker, more stable sauce. Regular whole milk works but produces a slightly thinner sauce that may also be more likely to separate if it gets too hot.
Sharp cheddar is the backbone, it gives you that classic mac and cheese flavor. The Parmesan is non-negotiable as a thickener and flavor builder. For your third cheese, sharp cheddar and mild cheddar together give you a balanced blend, but you can swap in Gruyère (nuttier), Gouda (smoky and smooth), or Monterey Jack (mild and melty). Avoid fresh cheeses like ricotta or fresh mozzarella, they do not melt properly into a sauce.
Always add a splash of milk, about 2-3 tablespoons when reheating. Mac and cheese thickens considerably as it cools because the starch continues to absorb the sauce. The milk loosens it right back up. Stir continuously over low heat on the stovetop for the best results.
You can try it with gluten-free pasta, but results vary by brand. Most testers (including other food bloggers) report that gluten-free pasta tends to become mushy under pressure because it cooks faster and has a different starch structure. If you try it, reduce the cook time to 2-3 minutes and check for doneness.
Yes! Muenster is a mild, very melt-friendly cheese that blends beautifully into a mac and cheese sauce. It does not have a strong flavor on its own, but it adds a super creamy, smooth texture. Combine it with sharp cheddar so you still get that classic tangy mac and cheese taste.
Absolutely. For a crispy top, transfer the finished mac and cheese to a baking dish, top with breadcrumbs and a little melted butter, and broil for 3-4 minutes until golden. You can also use an air fryer lid attachment if your Instant Pot model supports one.
📖 Recipe

Pressure Cooker Mac and Cheese Recipe
Video
Equipment
- 1 Pressure Cooker
Ingredients
- 16 ounces macaroni pasta, or shells
- 4 cups chicken stock, or water
- 4 tablespoons butter
- 1 teaspoon dry mustard powder
- 1 teaspoon garlic powder
- 1 teaspoon ground black pepper
- ½ teaspoon salt
- ½ cup evaporated milk
- ½ cup parmesan cheese, grated
- 2 cups sharp cheddar cheese, shredded
- 1 cup mild cheddar cheese, shredded
Instructions
- Using a pressure cooker, add pasta, chicken stock or water, butter, dry mustard, garlic powder, salt, and pepper. Cover with lid making sure the knob is set to sealing and not venting.
- Cook on manual for 4 minutes. Carefully use the quick release function. Remove the lid and allow the steam to escape.
- Stir to distribute the liquid. Add the evaporated milk. Stir to combine.
- Add the parmesan cheese, sharp cheddar cheese, and mild cheddar cheese. Stir to combine.
- Continue stirring until the cheese has completely melted and the pasta is coated in the cheese sauce. Serve warm and store any leftovers in an airtight container in the refrigerator.
Did You Make This Recipe?
If you give this pressure cooker mac and cheese a try, I would love to know what you think! Leave a comment below and let me know how it turned out, and if you made any fun cheese swaps, I definitely want to hear about those too. Share a photo on Instagram and tag @SimplyLaKita so I can see your beautiful bowl of mac and cheese, or save this recipe on Pinterest for later. Happy cooking, y'all!

Adri Ruff says
I can’t wait to make this! One of my favorite comfort foods.
LaKita says
Yes!! It is the best comfort food. Hope you enjoy it!
Aline says
This recipe was great times infinity!! My family went nuts - Thank you!
LaKita says
Yay!! I'm so glad it was a hit!
SHANIKA says
I've never tried making Mac + Cheese in a pressure cooker, but I could only imagine how tender and creamy this recipe is!
LaKita says
It is so creamy and tender!
Jazz says
Mac & cheese in minutes?? This is everything!
LaKita says
Yes!! It is so convenient!
Jacynthe says
Can I cut this recipe in half and not change any of the Instant Pot settings? Or will Instant Pot settings change because there is half the food inside?
Thanks in advance
LaKita says
Yes, you sure can. I've tried it with less shell pasta with no problem.
Kenya Rae says
I am all the way here for this!! Comfort food season is indeed upon us.
LaKita says
YES!!! Bring on all the comfort food recipes!!
Mila Claqrke Buckley says
This looks incredible! So creamy and cheesy!!
LaKita says
Thank you! Yes and yes!
Katrina Adams says
The chicken broth definitely makes me want to try this recipe!! Thank you for sharing!!!
LaKita says
It gives it so much more flavor than using water!
Tynia says
This mac and cheese looks delicious and so easy. I need to stop playing and get a pressure cooker.
LaKita says
Thank you! Yes, it is so worth it! Check out the Black Friday deals for it.
Tamara J. says
This is definitely a great “go-to” side dish. I love pulling out the pressure cooker for tasty quick food!
LaKita says
I agree it has become my new favorite way to cook!
Marta says
Ooooh! I love that we're doing this in a pressure cooker! Now I have a last minute go-to for those busiest of days.
LaKita says
Yes Marta! It is perfect for busy days
Allen paul says
In love with this recipe. It’s fast and easy to make
LaKita says
Thank you Paul!