

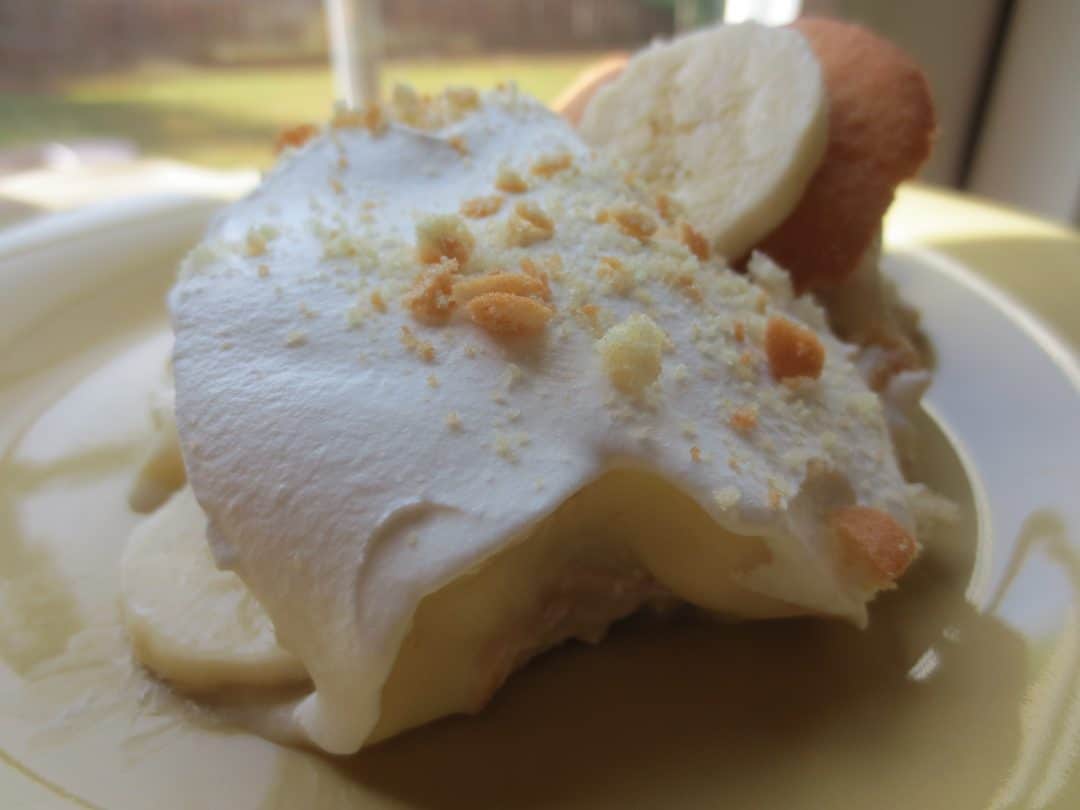
Homemade Banana Pudding is a creamy, classic dessert made from scratch with real vanilla pudding, fresh bananas, and vanilla wafers. It's an easy old-fashioned recipe that's rich, comforting, and perfect for holidays, potlucks, or Sunday dinner.
Updated March 2026: I've refreshed this post with expanded tips, a full FAQ section, make-ahead guidance, and everything you need to know about making banana pudding from scratch. Same beloved recipe, now even more helpful! Originally posted May 24, 2013.
There are two kinds of banana pudding in this world. The kind made with a box of instant pudding, and the kind your grandmother stood over the stove making from scratch. I grew up knowing both, but there's something about that cooked custard version that feels like a hug from the inside out. My family has been making banana pudding this way for as long as I can remember, and every time I make it, I'm right back at a Sunday table, waiting for that first sweet, creamy spoonful.
Making banana pudding from scratch sounds intimidating, but I promise you, if you can stir a pot, you can make this. The egg yolk custard takes all of about five minutes on the stove, and the result is so rich, so silky, and so deeply flavored that you'll never look at a box of pudding mix the same way again. I've made this recipe more times than I can count, tweaked it, tested it on my family, and brought it to more potlucks than I care to admit.
This is the real deal, y'all. Let's get started!
Jump to:
Why You'll Love This Homemade Banana Pudding
- From-Scratch Custard - Real egg yolks, whole milk, and butter make a custard that's richer and creamier than anything from a box. The flavor difference is unmistakable.
- Simple Ingredients - You probably already have the pudding ingredients in your kitchen. Sugar, cornstarch, eggs, milk, butter, and vanilla.
- Classic Southern Comfort - Layers of soft vanilla wafers, fresh bananas, and creamy pudding. This is the version that belongs on every family table.
- Make-Ahead Friendly - The pudding needs a couple of hours to chill, which makes it perfect for potlucks, holidays, and Sunday dinners when you want to get ahead.

Ingredients You'll Need

- Granulated Sugar - Sweetens the custard without any heavy flavor. Regular granulated or pure cane sugar both work perfectly here.
- Cornstarch - This is your thickening agent. Make sure it's fully dissolved in the milk before you apply heat. Any undissolved cornstarch will cause lumps.
- Salt - Just a pinch, but it does a lot. It balances the sweetness and makes all the other flavors pop.
- Whole Milk - The base of the custard. Whole milk gives you the richest result. Canned evaporated milk also works beautifully and adds a slightly deeper flavor.
- Egg Yolks - Four egg yolks are what separate this from a basic pudding. They add richness, body, and that gorgeous golden color to the custard.
- Butter - Stirred in during cooking to make the pudding silky smooth. Salted or unsalted both work.
- Vanilla Extract - Use pure vanilla extract or vanilla bean paste. This is the flavor backbone of the whole custard, so quality matters.
- Vanilla Wafers - The classic choice. They soften as the pudding chills and practically melt into those layers. That soft, almost cake-like texture is what makes banana pudding so special.
- Bananas - Choose bananas that are ripe but still firm. Yellow with no major brown spots is the sweet spot. Just ripe enough to be sweet, firm enough to slice cleanly.
- Whipped Topping (optional) - A layer of whipped topping before serving adds a light, creamy finish. Homemade whipped cream also works.
👉🏾 See the recipe card below for exact quantities and full instructions.
How to Make Homemade Banana Pudding From Scratch
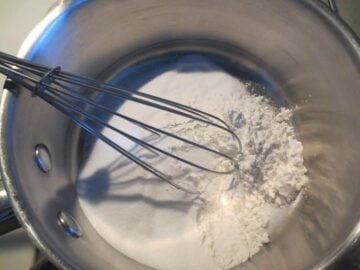
Step 1: Combine the Dry Ingredients
Whisk the sugar, cornstarch, and salt together in a medium heavy-bottomed saucepan before adding any liquid. Getting them fully combined now prevents the cornstarch from clumping when it hits the milk.

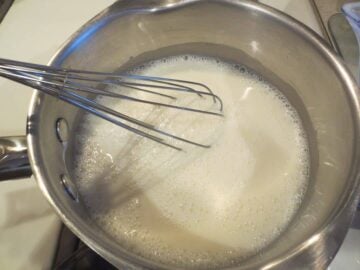
Step 2: Build the Custard Base
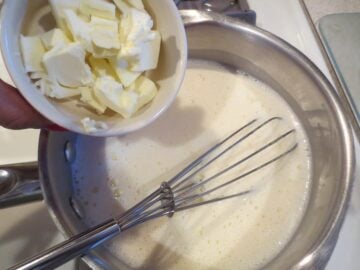
Gradually pour in the whole milk while whisking, dissolving the cornstarch completely as you go. Then whisk in the egg yolks and add the cubed butter. The heavy-bottomed pan matters here, it distributes heat evenly and protects against scorching.

Step 3: Cook Until Thick
Place the saucepan over medium heat, stirring constantly. As the mixture heats, it will go from thin and pourable to thick and glossy. This usually takes 4-6 minutes. When it reaches a simmer and holds a thick, smooth consistency, reduce the heat and cook for 2 more minutes, stirring continuously. Don't walk away, constant stirring is what keeps it smooth.

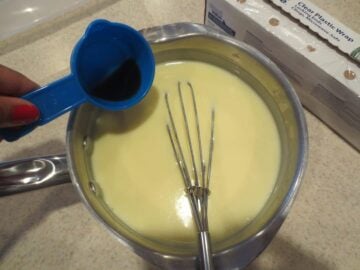
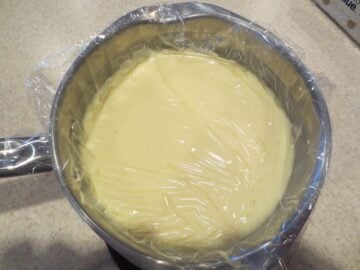
Step 4: Finish and Rest the Custard
Remove from heat and stir in the vanilla extract. Press plastic wrap directly onto the surface of the pudding. This prevents a skin from forming on top. Set aside to thicken while you prep the layers.


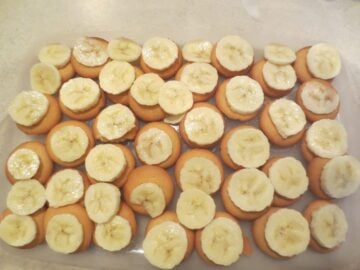
Step 5: Layer the Pudding
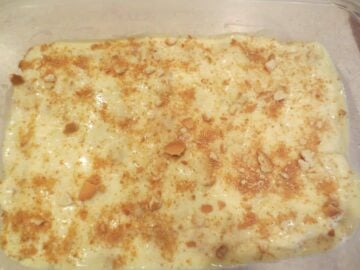
Line the bottom of a 2 to 2½-quart dish with vanilla wafers. Add a layer of banana slices, then half the pudding. Repeat another layer of wafers, the remaining bananas, then the rest of the pudding. Make sure all the banana slices are covered with pudding to slow browning.

Step 6: Chill and Serve
Press plastic wrap directly onto the pudding surface again and refrigerate for at least 2 hours. Just before serving, top with crushed vanilla wafers, whipped topping, or both.

Expert Tips
- Stir constantly, no exceptions - The moment you stop stirring, you risk the eggs scrambling or the pudding scorching on the bottom. Keep that whisk moving the whole time the pot is on the heat.
- Low and slow beats fast - Medium heat gets you there, there's no need to rush it on high. A custard made too fast turns grainy, and one made at the right pace turns silky.
- Cover bananas completely - Any banana slice peeking out from under the pudding will brown quickly. Use the back of a spoon to press pudding over every edge and corner.
- Plastic wrap directly on the pudding - Whether you're cooling the custard on the counter or chilling the assembled dish in the fridge, press wrap directly against the pudding surface, not over the dish opening. This prevents that leathery skin from forming.
- Use a heavy-bottomed pan - This is not the recipe for a thin-walled pot. A heavy-bottomed saucepan is your insurance against hot spots that scorch the custard.
- Let it chill the full 2 hours - The pudding thickens further as it cools, and the wafers soften into those gorgeous, almost-cakey layers. Cutting the chill time short means a runnny pudding and crunchy cookies. Patience pays off here.
- Serve within 2-3 days - The bananas will continue to soften and the wafers will break down over time. Best eaten within 48-72 hours of assembly.
Variations & Substitutions
- Top with meringue instead of whipped topping - This is the old-fashioned Southern way. Beat the reserved egg whites with sugar until stiff peaks form, spread over the top, and bake at 350°F for 10-12 minutes until golden.
- Use Chessmen butter cookies instead of vanilla wafers - A popular swap that adds a slightly richer, buttery layer. Pepperidge Farm Chessmen are a classic choice.
- Make individual servings - Layer in mason jars or glass cups instead of one large dish. The chilling goes faster too. Individual servings can be ready in about an hour.
- Add a splash of bourbon - Stir a tablespoon of bourbon into the finished custard with the vanilla for a grown-up twist.
- Use evaporated milk for extra richness - Swap the whole milk 1:1 with canned evaporated milk for a deeper, more concentrated custard flavor.
- Make it dairy-free - Substitute full-fat oat milk or coconut milk for the whole milk, and use vegan butter. The custard will be slightly less thick but still delicious.
Make-Ahead & Storage
Make-Ahead
The custard can be made up to 2 days in advance. Store it in an airtight container in the fridge with plastic wrap pressed directly onto the surface. When you're ready to assemble, give it a good whisk. It will have thickened considerably, then layer as directed. You can also fully assemble the dish up to 8 hours before serving for the best banana-to-wafer texture ratio.
Storage & Reheating
Store leftover banana pudding covered tightly in the refrigerator for up to 3 days. The bananas will continue to soften and may darken slightly, but the flavor stays good. This dessert is not a candidate for the freezer, the custard will separate when thawed. Serve cold straight from the fridge, no reheating needed. If the pudding has thickened more than you'd like after chilling, stir a splash of milk into your serving to loosen it up.
Want To Save This Recipe?
What to Serve with Homemade Banana Pudding
- As the star of a Southern dessert spread - Set it out alongside Chess Squares and Chocolate Delight for a full Southern dessert table at your next potluck or family reunion.
- After a Southern Sunday dinner - This pudding is the perfect finish after Southern Cornbread and your favorite main dish.
- Paired with the no-bake version - If you want to offer guests a choice, serve this from-scratch custard version alongside the Easy Banana Pudding Recipe for a true banana pudding bar.
- Topped with homemade whipped cream - A simple dollop of sweetened whipped cream takes the whole thing to the next level.
- Alongside Banana Pudding Tres Leches Cake - If you're having a banana moment (no judgment), Banana Pudding Tres Leches Cake is the ultimate companion.

Frequently Asked Questions
The from-scratch version uses egg yolks cooked into a custard on the stovetop, which gives it a richer, silkier texture and deeper flavor. The no-bake version typically uses instant pudding mix and sweetened condensed milk, it's faster and still delicious, but the texture is lighter. If you want the classic, old-fashioned Southern banana pudding your grandmother made, this is the one.
Lumpy custard almost always comes from one of two things. Undissolved cornstarch or eggs that cooked too fast. Make sure the cornstarch is fully dissolved in the milk before heating, and stir constantly over medium (not high) heat. If you do end up with small lumps, strain the custard through a fine mesh sieve while it's still hot.
A few strategies help: choose bananas that are ripe but still firm (not overripe), make sure every banana slice is completely covered by pudding, and serve within 1-2 days of assembly. For extra protection, toss the banana slices in a tiny squeeze of lemon juice before layering. It won't affect the flavor noticeably but slows oxidation significantly.
Absolutely! In fact, making it the night before gives the layers time to meld perfectly. The wafers soften beautifully overnight and the flavors deepen. Just keep it tightly covered in the fridge and add any whipped topping right before serving.
Yes! Canned evaporated milk works as a 1:1 swap and actually makes the custard slightly richer and more concentrated in flavor. It's a great choice if you want an even more indulgent result.
Pepperidge Farm Chessmen butter cookies are the most popular substitute. They add a buttery, shortbread-like layer that's absolutely delicious. Shortbread cookies, graham crackers, or even ladyfingers all work well too, though each changes the flavor and texture slightly.
Yes, meringue is actually the traditional topping for old-fashioned Southern banana pudding. Beat 3-4 egg whites with a few tablespoons of sugar until stiff peaks form, spread over the assembled pudding, and bake at 350°F for about 12 minutes until the meringue is lightly golden.
It keeps well for 2-3 days, tightly covered. The texture is best within the first 48 hours. After that, the bananas continue to soften and darken and the cookies break down further. It's still perfectly safe and tasty, just a different texture.
Freezing isn't recommended for this recipe. The cooked custard tends to separate and become grainy when thawed, and the bananas don't survive freezing well at all. Make it fresh and enjoy it within a few days.
If the custard has thickened more than you'd like after chilling, whisk in a splash of whole milk (1-2 tablespoons at a time) until it loosens to your preferred consistency. Do this before assembling the layers for the smoothest result.
📖 Recipe
Homemade Banana Pudding Recipe
Ingredients
- ⅔ cup granulated sugar
- 3 tablespoons cornstarch
- ⅛ teaspoon salt
- 3 cups whole milk
- 4 large egg yolks
- 3 tablespoons butter, cut into cubes
- 1 ½ teaspoons vanilla extract
- 11 ounces vanilla wafers
- 4 large ripe bananas, sliced
- whipped topping (optional)
Instructions
- Mix sugar, cornstarch, and salt together thoroughly in a medium heavy-bottomed saucepan.
- Gradually stir in the milk, making sure to dissolve the cornstarch completely.
- Whisk in the egg yolks thoroughly, and add in cut pieces of butter, stirring constantly heat over medium heat until the mixture just comes to a simmer. Reduce the heat to low, stirring briskly, bring to a simmer and cook for 2 minutes (Pudding will be thick and smooth).
- Remove the saucepan from heat and stir in the vanilla extract.
- Press plastic wrap directly onto the surface of the pudding and set aside.
- Have the vanilla wafers ready, peel and slice (¼ inch thick) 3 to 4 bananas. Line the bottom of a 2 to 2 ½-quart dish with the wafers. Top the wafers with banana slices and cover with half of the pudding. Arrange a layer of wafers over the top of the pudding, then cover it with the remaining banana slices, and pudding.
- Be sure to spoon pudding over any exposed bananas to prevent browning. Press plastic wrap directly onto the surface of the pudding (or cover) and refrigerate for at least 2 hours.
- Just before serving cover with vanilla wafer crumbs, whipped topping, or both. Enjoy!

Did You Make This Recipe?
If you give this homemade banana pudding from scratch a try, I'd love to know what you think! Leave a comment below, share a photo on Instagram and tag @SimplyLaKita, or save it on Pinterest for later. And if you have any questions about the custard technique, drop them in the comments! I'm happy to help you nail it.

Leave a Reply